How to Fit Your Bike
Bicycles come in different sizes, just like pants, but you're probably reading this wondering just how to fit a bike. While you can ride a bike that’s not quite the right size for a short distance, you could notice knee pain or back pain if you start going on longer distance road bike rides or multiday bikepacking trips. So having a proper bike fit from the start is best to ward off preventable injuries.
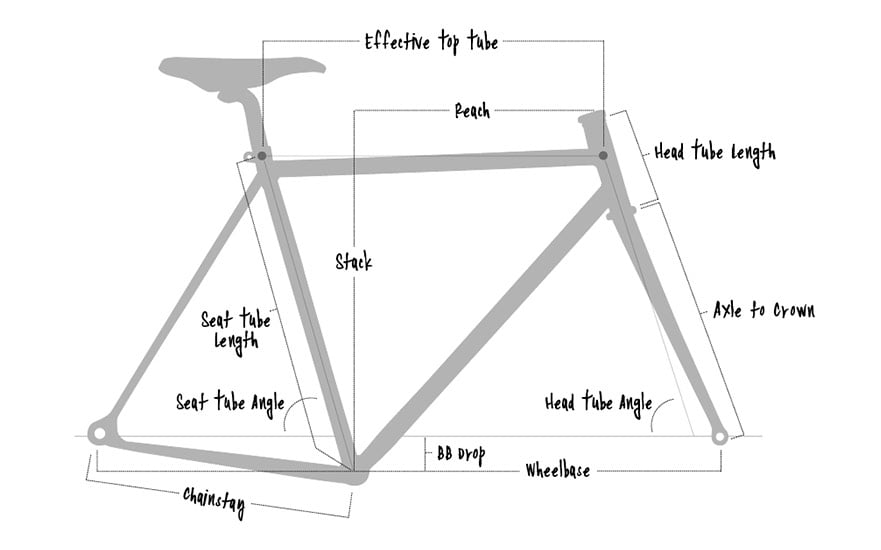
Some bike manufacturers use seat tube length in centimeters to indicate sizing, while others have switched to Small, Medium, Large, XL, etc. The seat tube measurement is typically taken from the center of the bottom bracket to either the middle or top of the top tube.
See the diagram below for other common bike frame measurements used in determining your bike's fit and function. We'll break down the most important measurements below to help you figure out how to fit a bike — specifically road bike fit and gravel bike fit.
>> Wondering how to fit a mountain bike? Check out our tailored Mountain Bike Size Chart, Fit & Frame Geometry guide.
Standover Height
Standover height is just what it implies – you put your leg over the bike frame with the shoes you intend to ride in and stand flat-footed on the floor. If you're trying to figure out how to fit a road bike or gravel bike, you'll probably be working with a flat top tube (the same height at the handlebar end as the seat end). You should have an inch or two of clearance between your crotch and the top tube, more if the top tube is sloping.
This is a good method of determining frame size and ensures you can stand comfortably with both feet on the ground while waiting in traffic. However, what stand over height doesn’t accurately measure is the distance between the saddle and the pedals, where you’ll spend most of your time while cycling.
If you don’t have the actual bike handy, and the manufacturer provides the standover height, you can measure your inseam and pick a frame size that will fit.
Inseam Measurement
To measure your inseam, stand flat-footed with shoes off and put a carpenter’s level between your legs. Pull the level up snugly enough to approximate the pressure of your weight when riding, making sure it’s parallel to the ground. Have a friend measure the distance from the top of the level to the ground and write down the number. Using centimeters is usually more convenient, as that’s standard within the bike industry.
PS, wear bike shorts or underwear when you do this; if you measure while wearing jeans, the measurement will be short, and you won't get a proper bike fit.
Dialing in Your Fit
Personal physiology, amount of time spent on the bike, and flexibility all affect how high to set your saddle.
You can adjust the distance from the saddle to your pedals by moving the seat up or down. Usually, this is done by loosening the bolt holding the seat post with an Allen key, raising or lowering the saddle, then re-tightening the bolt. Some bikes come with a quick release to allow this adjustment without tools.
One common method of figuring out your saddle height is the Lemond Method (from Greg Lemond’s Complete Book of Cycling). First, measure your inseam as described above and multiply that number by .833 to get the distance from the top of your saddle to the center of the bottom bracket. Keep in mind that this recommendation is for experienced cyclists, so if you are new to cycling, you may want to begin with your saddle a centimeter or two lower and raise it gradually as you get used to the bike.
Cockpit Length: Top Tube + Stem
The length of your bike from the saddle to the handlebars is also key to a proper bike fit. Most methods of calculating this distance involve measuring your torso length and arm length and using a formula or bike fit calculator, but the truth is what will be comfortable is highly personal.
You’ll want to arrive at a cockpit length that lets you ride with your upper body angled forward and arms comfortably bent. The ideal position varies greatly depending on how you plan to use the bike, your body type, and your flexibility.
You can adjust the length of your cockpit by changing the length of your stem or moving the saddle backward or forward. Stems are usually available in one-centimeter increments; if you’ve ridden your bike for a few weeks and feel that you’d like to be more upright or stretched out further, you can change to a different length stem. Most saddles have several centimeters of fore/aft adjustment, too, but moving your saddle can affect your pedaling dynamics and weight distribution on the bike.
Remember that your handlebars can also be adjusted for height – most recreational cyclists prefer their bars level with or slightly lower than their saddle. In contrast, racers typically prefer their bars 3 or more inches lower than their saddle. Casual cyclists, on the other hand, may be fine with bars quite a bit higher than their saddle.
Bike saddles can be tilted as well as moved forward and backward, usually by loosening the same fasteners. A level saddle is suitable for most people, as it offers the best compromise between comfort and holding you securely in place.
Some riders, women especially, find that tilting the nose (front) of the saddle down slightly increases comfort, but it can also increase fatigue in your arms as you’ll tend to slide forward constantly. If you can’t find a comfortable saddle angle after a few weeks of riding, consider changing saddles – many different shapes may work better with your anatomy.
Handlebar choice and brake lever position also affect your position on the bike. For example, riding a flat or riser bar will put you in a more upright position than riding with your hands on the brake hoods of a drop bar, and riding in the drops will make you lower and even more stretched out. Handlebars also come in different widths; if you feel like your hands are too close together (making breathing more difficult) or too far apart (less aerodynamic), you can switch bars – most people prefer a neutral width about as wide as their shoulders.
We hope this guide gives you a little more clarity on how to fit a bike. The above measurements should help you get a proper gravel bike fit, road bike fit, and hybrid bike fit. Unfortunately, figuring out how to fit a mountain bike is a whole other game, but we've got a handy guide for that too.
Finding a riding position that fits your riding style and body type is the most important thing – don’t be afraid to experiment a bit, and expect to change your ideas about what’s comfortable as your riding habits change. If you're buying a new bike, one of the best ways to identify your perfect fit is through demoing different sizes, models, and brands. Mountain bike demos are available at our Seattle, Portland, Salt Lake City, and Denver stores.
Need a tune up? Bring your bike in for maintenance at any of our flagship locations for assistance:
Learn More With Our Other Bike Guides:
- Mountain Bikes - How to Choose
- Mountain Bikes - Size and Fit Guide
- Mountain Bikes - How to Get Started Mountain Biking
- Mountain Bikes - How to Choose a Wheel Size
- Mountain Bikes - Suspension Basics
- Mountain Bikes - How to Choose a Mountian Bike Dropper Post
- Mountain Bikes - How to Choose MTB Handlebars
- Mountain Bikes - How to Choose MTB Pedals
- Mountain Bikes - How to Change Bike Pedals
- Mountain Bikes - How to Clean
- Mountain Bikes - How to Bleed SRAM Brakes
- Mountain Bikes - How to Bleed Shimano Brakes
- Mountain Bikes - How to Convert to Tubeless Tires
- Mountain Bikes - How to Replace Internal Cable Housing
- Mountain Bikes - How to Adjust Your Rear Derailleur
- Mountain Bikes - How to Bleed a RockShox Reverb Seatpost
- Mountain Bikes - How to Service Fox and RockShox Fork Lowers
- Mountain Biking - What to Bring Mountain Biking
- Mountain Biking - What to Wear Mountain Biking
- Mountain Biking - How to Choose Knee Pads
- Bikes - Size and Fit Guide
- Gravel Bikes - How To Get Started Gravel Biking
- eBikes - Classes, Features & More
- eBikes - Where to Ride eBikes
- Bike Accessories - Helmet Size & Fit Guide
- Bike Accessories - How to Choose Bike Shoes
- Bikes - How to Choose Bike Tires
- Bikes - How to Change Bike Pedals
- Bikes - How to Repair & Replace a Bike Chain
- Bikes - How to Choose Accessories
- Bikes - Urban Riding Tips
- Travel & Destination Guides - Where to Mountain Bike
Learn About our Favorite Bike Gear:
The Best Women's Mountain Bikes
The Best Electric Mountain Bikes
The Best Mountain Bikes for Beginners
The Best Mountain Bikes Under $3,000
The Best Trail Bikes
The Best Enduro Bikes
The Best Gravel Bikes
The Best Mountain Bike Helmets
The Best Full Face MTB Helmets
The Best Mountain Bike Knee Pads
The Best Mountain Bike Elbow Pads
The Best Mountain Bike Shorts
The Best Women's Bike Shorts
The Best Mountain Bike Pants
The Best Mountain Bike Jerseys
The Best Mountain Bike Accessories
The Best Value Mountain Bike Helmets
The Best Dropper Posts
The Best Mountain Bike Forks
The Best Mountain Bike Stems
The Best Padded Mountain Bike Shorts
The Best Mountain Bikes Handlebars
The Best Gifts for Mountain Bikers
The Best Mountain Bike Gloves
The Best Mountain Bike Socks
The Best MTB Fanny Packs
The Best Mountain Bike Backpacks
The Best Clipless Mountain Bike Shoes
The Best Flat Pedal MTB Bike Shoes
The Best Mountain Bike Tires
The Best Mountain Bike Flat Pedals
The Best Bike Racks
The Best Bike Glasses
The Best Bike Goggles
The Best Women's Mountain Bike Jerseys
The Best Tailgate Bike Pads
The Best Bike Trainers
The Best Hitch Bike Racks
The Best Clipless MTB Pedals
The Best Mountain Bikes Handlebar Bags
The Best Mountain Bike Saddles
The Best MTB Wheels
The Best MTB Grips
The Best Mountain Bike Multi Tools
The Best Mountain Bike Seat Bags
This is evo. We are a ski, snowboard, wake, skate, bike, surf, camp, and clothing online retailer with physical stores in Seattle, Portland, Denver, Salt Lake City, Whistler, and Snoqualmie Pass. Our goal is to provide you with great information to make both your purchase and upkeep easy.
evo also likes to travel to remote places across the globe in search of world-class powder turns, epic waves, or legendary mountain biking locations through evoTrip Adventure Travel Trips. Or, if you prefer to travel on your own, check out our ski & snowboard resort travel guides and mountain bike trail guides.
Still have questions? Please call our customer care team at 1.866.386.1590 during Customer Care Hours. They can help you find the right setup to fit your needs.