How to Repair or Replace A Bike Chain
Your bike’s chain is one of the most important, and easiest to overlook parts on the whole bike. It’s a small, relatively inexpensive part that’s responsible for a whole lot. Without it, you’re not going anywhere. But, because it’s so small, and because most bike chains are generally reliable, many riders don’t pay as much attention to them as they should.
That’s a huge oversight. When bike chains do break, it’s catastrophic - they snap and leave you stuck. And it’s important to monitor the wear of your chain. An old, worn bike chain might feel fine when you’re riding, but can wear down your whole drivetrain, leaving you with a much more expensive problem down the road. So we’ve broken down how to maintain your bike’s chain, as well as how to repair, or replace it.
Types of Bike Chains
Generally, bike chains are defined by the number of cogs on your rear cassette. So if you have eight gears on your back wheel, you should be using an eight-speed chain. 12 gears gets a 12-speed chain. That’s because the number of gears the chain shifts between determines how wide the chain should be. You might be able to fit your 12-speed chain on an eight-speed cassette, but it won’t work well and will wear out fast. So, before you read the rest of this article, figure out what number of speeds your chain needs to be.
Beyond that, many different brands make bike chains, some with special coatings or features to help them run smoother. It really comes down to personal preference, as long as your chain matches the number of gears on your back wheel, you can mix and match brands with the rest of your drivetrain, no problem.
Bike Chain Tools and Parts
It doesn’t take expensive tools or fancy parts to work on your bike’s chain - though you will need specialized tools. You’ll need a simple chainbreaker tool (most multitools will have one), a “master link” for your chain, and a pair of needle-nose pliers.
A “master link” is a special link that all new chains should come with. You can also buy one separately. It allows you to “break” or replace your chain without using tools. So you can take your chain on or off the bike without using a chain tool. However, some master links can be sticky, so a pair of needle nosed pliers can be helpful.
How to Remove a Bike Chain
- Shift into your smallest gear on the back
- Take a picture of the chain routing
- Lock, or turn off your derailleur’s clutch
- Find the master link
- Break the chain
- Don’t lose the master link
- Remove the chain
- Use a chain tool to push a pin almost all the way out of the back of the chain
- Stop before the pin falls out to make it easier to put back together
- Optional: Buy a master link for your chain (it should be for the same number of speeds as the rest of your drivetrain)
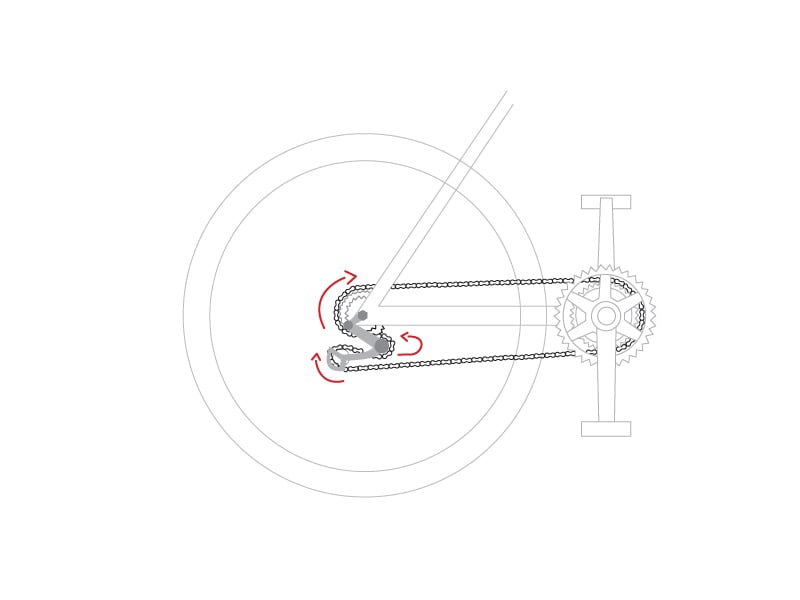
So, you’ve got this chain, how do you get it off the bike. On most bikes, the chain routes through the “rear triangle” formed by your chainstays, seatstays, and seat tube. So you have to “break” the chain to get it off the bike.
Breaking a bike chain is very easy. First, shift down all the way into your hardest gear, the smallest cog on your cassette. Then, take a picture of how your chain routes through your derailleur to use later for reference. If you have a clutch type derailleur, either turn off the clutch (for Shimano drivetrains) or lock it open (SRAM drivetrains) to make the chain slack.
Then check the chain for a master link. A master link will have slots on the side, instead of just holes for the pins. If you have a master link, use your hands or your pliers to push the diagonally opposite corners together so that the links pop off the pins. Unthread it from the cogs and derailleur, making sure not to lose the master link parts.
If your chain doesn’t have a master link, repeat the same steps, but then use your chain tool to push one of the pins out the back of the chain. Make sure to stop turning your chain tool while the pin is still stuck in one of the outside links of the chain. You don’t want it to fall all the way out, since it’s a lot harder to put it back together if it does.
How to Replace a Bike Chain
- Use your reference pictures to re-route the chain
- Make sure your chain is running the right direction
- Don’t put it over the front chainring yet
- Snap the master link back together by hand
- Route the chain over the front chainring
- Lock your rear brake and backpedal until the master link is on top, between the chainring and cassette
- Push down a pedal to snap the master link back together all the way
Getting your chain off is the easy part, now you’ve just got to get it back on, the right way. Don’t worry, it’s easier than it sounds. First, if you’re using a new chain, just make sure it’s the same length as the old one. You can use a chain breaker tool to remove links if needed. Just make sure to leave inner links on the end, or you won’t be able to connect your master link.
Next, look at that handy picture you took when you took the chain off. Use it as a reference to route the chain back through your derailleur, and out of the rear triangle. Don’t put the chain on your front chainring yet though, you want all the slack you can get at this point. Double-check to make sure your chain is routed the right direction, some chains have arrows that should point the direction the chain will travel as you pedal. If yours doesn’t, don’t worry about it.
If you have a master link, line the slots up with the pins and just tug it a little with your hand to snug it. Don’t worry about tightening it all the way. Put the chain back on the chainring and lock the rear brake of your bike. Backpedal the cranks so that the master link is on the top part of the chain, between the chainring and cassette. With the brake locked, push down on a pedal until the link snaps all the way closed.
If you don’t have a master link, the steps are the same, you’ve just got to use your chain tool to push the pin you loosened back through. This part can be a pain - if you can’t get it, just buy a master link for your chain. They cost just a few dollars, and can save you some major headaches, especially if you ever need to take your chain off again.
If your chain happens to break out on a ride, it’s an easy fix if you’ve got a spare master link with you. You just thread the link into the broken ends of the chain, lock it down, and keep on riding.
How Often Should you Replace a Bike Chain?
There is no hard rule for how many miles a chain will last. It really depends on your riding style, and conditions. For average road or commuter bikes, you can expect to get about 1000 miles out of each chain. For most mountain bikes it’s closer to 500. But, don’t go by some arbitrary distance, instead, just check your chain for wear periodically, as shown below. If you’re really cranking on the pedals a lot, pushing hard gears with strong legs, your chain will wear out faster. Similarly, riding in mud or grit will also speed up wear.
To understand why you need to replace your bike chain, it’s important to talk about how chains wear out over time. Often people refer to their chain “stretching” as it wears out, and thus needing to be replaced. That’s actually not true. Chains don’t “stretch.” Your legs aren’t stretching the metal plates that they are made of. Instead, the little holes in each link that the pins run through are wearing bigger slowly. This, combined with wear in the chain’s bushings gives the pins more play, which can make the chain looser, and the space between links slightly longer.
Your cassette and chainring are precisely engineered to work with a specific space between chain links. If your chain is worn, that space changes, and if you don’t change it in time your chain will actually wear out the rest of your drivetrain to its new spacing. That means that when you do finally replace your chain, you might have damaged your cassette. So it’s important to replace your chain before that happens.
How to Check Your Bike Chain for Wear
To take the guesswork out of knowing when to replace your chain, manufacturers have come up with inexpensive gauges. Your local bike shop will have one, or you can just purchase one for your garage. Every few weeks, use it to check your chain.
The gauge simply slots between a few links of your chain, and measures the distance between them. If one end won’t even fit into your chain, it means it’s nearly new and barely worn. It also will have markings to let you know when your chain is halfway worn out, and 75% of the way worn out. It’s a good idea to replace your chain before you get to that 75% point.
Need a tune up? Bring your bike in for maintenance at any of our flagship locations for assistance:
Learn More With Our Other Bike Guides:
- Mountain Bikes - How to Choose
- Mountain Bikes - Size and Fit Guide
- Mountain Bikes - How to Get Started Mountain Biking
- Mountain Bikes - How to Choose a Wheel Size
- Mountain Bikes - Suspension Basics
- Mountain Bikes - How to Choose a Mountian Bike Dropper Post
- Mountain Bikes - How to Choose MTB Handlebars
- Mountain Bikes - How to Choose MTB Pedals
- Mountain Bikes - How to Change Bike Pedals
- Mountain Bikes - How to Clean
- Mountain Bikes - How to Bleed SRAM Brakes
- Mountain Bikes - How to Bleed Shimano Brakes
- Mountain Bikes - How to Convert to Tubeless Tires
- Mountain Bikes - How to Replace Internal Cable Housing
- Mountain Bikes - How to Adjust Your Rear Derailleur
- Mountain Bikes - How to Bleed a RockShox Reverb Seatpost
- Mountain Bikes - How to Service Fox and RockShox Fork Lowers
- Mountain Biking - What to Bring Mountain Biking
- Mountain Biking - What to Wear Mountain Biking
- Mountain Biking - How to Choose Knee Pads
- Bikes - Size and Fit Guide
- Gravel Bikes - How To Get Started Gravel Biking
- eBikes - Classes, Features & More
- eBikes - Where to Ride eBikes
- Bike Accessories - Helmet Size & Fit Guide
- Bike Accessories - How to Choose Bike Shoes
- Bikes - How to Choose Bike Tires
- Bikes - How to Change Bike Pedals
- Bikes - How to Repair & Replace a Bike Chain
- Bikes - How to Choose Accessories
- Bikes - Urban Riding Tips
- Travel & Destination Guides - Where to Mountain Bike
Learn About our Favorite Bike Gear:
The Best Women's Mountain Bikes
The Best Electric Mountain Bikes
The Best Mountain Bikes for Beginners
The Best Mountain Bikes Under $3,000
The Best Trail Bikes
The Best Enduro Bikes
The Best Gravel Bikes
The Best Mountain Bike Helmets
The Best Full Face MTB Helmets
The Best Mountain Bike Knee Pads
The Best Mountain Bike Elbow Pads
The Best Mountain Bike Shorts
The Best Women's Bike Shorts
The Best Mountain Bike Pants
The Best Mountain Bike Jerseys
The Best Mountain Bike Accessories
The Best Value Mountain Bike Helmets
The Best Dropper Posts
The Best Mountain Bike Forks
The Best Mountain Bike Stems
The Best Padded Mountain Bike Shorts
The Best Mountain Bikes Handlebars
The Best Gifts for Mountain Bikers
The Best Mountain Bike Gloves
The Best Mountain Bike Socks
The Best MTB Fanny Packs
The Best Mountain Bike Backpacks
The Best Clipless Mountain Bike Shoes
The Best Flat Pedal MTB Bike Shoes
The Best Mountain Bike Tires
The Best Mountain Bike Flat Pedals
The Best Bike Racks
The Best Bike Glasses
The Best Bike Goggles
The Best Women's Mountain Bike Jerseys
The Best Tailgate Bike Pads
The Best Bike Trainers
The Best Hitch Bike Racks
The Best Clipless MTB Pedals
The Best Mountain Bikes Handlebar Bags
The Best Mountain Bike Saddles
The Best MTB Wheels
The Best MTB Grips
The Best Mountain Bike Multi Tools
The Best Mountain Bike Seat Bags